Note: I’ve created a new iOS5 friendly version of this template/tutorial.
If you are a Web and iOS developer like myself, the temptation of blending these two things is all too great. One disadvantage of making web apps that run straight from Safari, however, is that they can’t harness many of the device’s awesome functionalities. The good news is that, with a small foundation of objective-C code, you can make a native iOS app that takes full advantage.
This article is about blending all the pieces together – HTML, CSS, Javascript and Objective-C in order to develop a foundation for any future native web app with the device Camera functionality added to get you started.
Let’s briefly go over the steps of what we will do:
- Review the demo HTML, CSS, and Javascript components we will add to the XCode Project
- Start a new XCode Project using the single view-based app template.
- Add a UIWebView to our View Controller in Interface Builder and make one connection
- Load the HTML, CSS and Javascript files in to the Web View
- Create a UIWebViewDelegate which listens for link clicks and dispatches accordingly
- Use the UIImagePicker to take a picture with the phone
- Encode the image to Base64 and pass it back through Javascript
The HTML, CSS and Javascript
Below I have embedded the HTML View that we will be adding in to our XCode project, give it a whirl! You should notice that two of the links are seemingly dead – these will be linked with Objective-C. This basic view is made up of three files – index.html, styles.css and scripts.js and also the jQuery library for convenience.
index.html
<!doctype html>
<head>
    <meta charset="utf-8">
      <meta name="viewport" content="width=device-width,initial-scale=1">

      <link rel="stylesheet" href="style.css">

      <script src="jquery-1.6.2.min.js"></script>
      <script defer src="script.js"></script>
</head>
<body id="body">
  <div id="container">

    <div id="main" role="main">
        <a href="/" class="js">jQuery Alert</a><br />
        <a href="objc://message">Objective-C Alert</a><br />
        <a href="objc://takePicture">Take a picture</a><br />
    </div><!-- #main -->

    <img id="testImage" src="iphonebattery.jpeg" />

  </div><!-- #container -->
</body>
</html>
styles.css
body {
    padding: 10px;
}

#main a{
    display: block;
    width: 90%;
    min-height: 24px;
    color: #FFF;
    background-color: #234234;
    border-radius: 5px;
    text-align: center;
    padding: 10px;
    text-decoration: none;
    text-transform: uppercase;
    font-weight: bold;
    -webkit-touch-callout: none;
   /* -webkit-user-select: none; */
}

#main a:hover{
    background-color: #432432;
}

#testImage{
    border: 1px solid #CCC;
    width: 100%;
    height: 66%;
}
scripts.js
$(document).ready(function(){
$("a.js").click(function(){
alert("You clicked on a link that activates javascript");
});
});
function processImage( img )
{
$('#testImage').remove();
$('#body').append( ' ' );
}
' );
}
We have set up a basic html document structure and 3 links in the HTML code. We then styled them in CSS to fit the dimensions of the screen, nothing very fancy. One noteworthy line in CSS is an iOS specific property that disables the callout when you hold your finger on a link:
-webkit-touch-callout: none;
Finally in the javascript, we take advantage of the jQuery library included and setup a listener for our “Jquery Alert” button as well as a function called processImage() which can take a base64 string of an Image and insert it where the battery image is currently showing.
The XCode Project
Now we can move on to our XCode project. You can build your own or follow along in the sample code.
I’ve used a simple View Based Application. First, in our WebViewController.h we should first declare an outlet for a UIWebView.
WebViewController.h
@interface WebViewController : UIViewController
{
    IBOutlet UIWebView *webView;
}

@property(nonatomic, retain) IBOutlet UIWebView *webView;

@end
Next, in the Interface builder we drag over a UIWebView on top of our UIView and make a connection between the IBOutlet and the UIWebView. This image basically demonstrates it all:
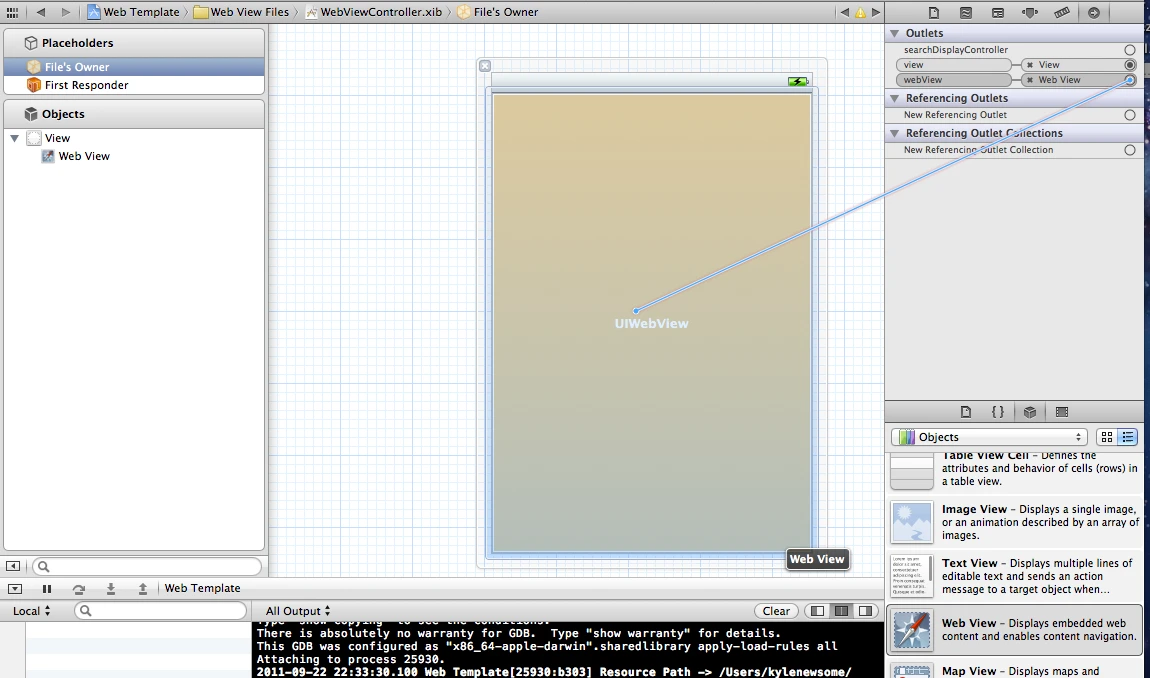
Out of Interface Builder and Into the Fire
With our connection set up we are now ready to NEVER TOUCH INTERFACE BUILDER AGAIN. Maybe that’s a little harsh, but you get the point. Now we just need to get our Web View to load our web files. We can do this all of inside of viewDidLoad.
Part Of WebViewController.m
#pragma mark - WebTemplateViewController

- (void)viewDidLoad
{
      [super viewDidLoad];

    //First we load up the index.html file
    NSString *path = [[NSBundle mainBundle] pathForResource:@"index" ofType:@"html"];
    NSData *htmlData = [NSData dataWithContentsOfFile:path];

    //Next we need to set up a proper base URL for our files
    NSString *resourceURL = [[NSBundle mainBundle] resourcePath];
    NSLog(@"%@", resourceURL); // <- the URL in the raw still needs some cleaning
    // Need to be double-slashes to work correctly with UIWebView, so change all "/" to "//"
    resourceURL = [resourceURL stringByReplacingOccurrencesOfString:@"/" withString:@"//"];
    // Also need to replace all spaces with "%20"
    resourceURL = [resourceURL stringByReplacingOccurrencesOfString:@" " withString:@"%20"];
    //And make a proper URL
    NSURL *baseURL = [NSURL URLWithString:[NSString stringWithFormat:@"file:/%@//",resourceURL]];

    //Finally let's load up the html data and passthe Base URL for the CSS and Javascript files
    [webView loadData:htmlData MIMEType:@"text/html" textEncodingName:@"UTF-8" baseURL:baseURL];

    //The delegate is where we will handle notifications from the UIWebView
    webView.delegate = [[WebViewDelegate alloc] init];

}
I've commented through this portion pretty well but to summarize - we only need to load the html page and then set a base url for all the additional files that the html page is requesting. Lastly we prepare our WebViewDelegate - the class I want to talk about next.
The Web View Delegate
While we are only going to be interested in one of the 4 callbacks in the UIWebViewDelegate Protocol, I wanted to share it with you as a whole nonetheless so that you can get a feel for what we can listen for:
UIWebViewDelegate Protocol
#pragma mark - WebViewDelegate Protocol

@protocol UIWebViewDelegate <NSObject>

@optional
//we want this one
- (BOOL)webView:(UIWebView *)webView shouldStartLoadWithRequest:(NSURLRequest *)request navigationType:(UIWebViewNavigationType)navigationType;
//the other three
- (void)webViewDidStartLoad:(UIWebView *)webView;
- (void)webViewDidFinishLoad:(UIWebView *)webView;
- (void)webView:(UIWebView *)webView didFailLoadWithError:(NSError *)error;

@end
So what does this one call back do for us? Well basically, the UIWebView asks the delegate for permission to navigate anywhere. If you return FALSE, the link won't be followed, if you return TRUE something amazing happens. Let's take a look at how we handle that now:
WebViewDelegate.h
@interface WebViewDelegate : NSObject
<UIWebViewDelegate,
UIImagePickerControllerDelegate> //we will also be using the UIImagePicker in this class
{
    UIWebView *webView;
}

@end
WebViewDelegate.m
@implementation WebViewDelegate

- (BOOL)webView:(UIWebView*)webViewRef shouldStartLoadWithRequest:(NSURLRequest*)request navigationType:(UIWebViewNavigationType)navigationType {
     //we are listening out for links being click
    if (navigationType == UIWebViewNavigationTypeLinkClicked)
    {

        NSURL *URL = [request URL]; //Get the URL

        //The [URL scheme] is the "http" or "ftp" portion, for example
        //so let's make one up that isn't used at all -> "objc"
        //
        if ( [[URL scheme] isEqualToString:@"objc"] ) {

            //hold a reference to this webview for calling back to the webview later
            webView = webViewRef;

            //The [URL host] is the next part of the link
            //so we can use that like a selector
            SEL method = NSSelectorFromString( [URL host] );

            if ([self respondsToSelector:method])
            {
                // if you delay the method just slightly,
                // you can get the <a> button to change color to
                // your CSS :hover state before the method takes action
                [self performSelector:method withObject:nil afterDelay:0.1f];
            }

            return NO;
        }

    }

   return YES;
}

-(void)message
{
    //Showing a basic pop up alert

	    NSString *message = [NSString stringWithString:
	                         @"You clicked on this test link" ];

	    UIAlertView *alert = [[UIAlertView alloc]
	                          initWithTitle:@"Message From OBJ-C"
	                          message:message
	                          delegate:nil
	                          cancelButtonTitle:@"OK"
	                          otherButtonTitles:nil, nil];

	    [alert show];
	    [alert release];
}
Before going into the next portion of this file, let's review these two functions. As I noted in the code above, we are taking advantage of [url scheme] in order to distinguish objective-c links from other link types such as "http://" links. Next we use [url host] to define the name of the selector we want to run.
This is an area that you can get creative with as there isn't really a right or wrong. If you are familiar with Web MVC frameworks like CodeIgniter of CakePHP (sorry, I only know PHP frameworks) then you might want to take a "/controller/action/parameters..." style approach.
With that there is one more important thing we must do - Use some of the device's functionality and pass that information back to our WebView.
WebViewDelegate.m continued
-(void)takePicture
{
    // Set the UIImagePicker to Camera and self as the delegate
    UIImagePickerController *imagePicker = [[UIImagePickerController alloc] init];
	imagePicker.sourceType = UIImagePickerControllerSourceTypeCamera;
	imagePicker.delegate = self;

    // Present the image picker
    id delegate = [[UIApplication sharedApplication] delegate];
	[[delegate viewController] presentModalViewController:imagePicker animated:YES];

    [imagePicker release];

}

#pragma mark - Image Picker
-(void)imagePickerController:(UIImagePickerController *)picker didFinishPickingMediaWithInfo:(NSDictionary *)info
{
    //Get the Image
	UIImage *image = [info objectForKey:@"UIImagePickerControllerOriginalImage"];

    //flatten it to NSData as a JPEG, low quality
    NSData *flatImage = UIImageJPEGRepresentation(image, 0.1f);

    // convert NSData to a base 64 encoded string
    // NSData+Base64 Category provided by Matt Gallagher
    // http://cocoawithlove.com/2009/06/base64-encoding-options-on-mac-and.html
    //
    NSString *image64 = [flatImage base64EncodedString];

    //process the image in javascript to be added to the page
    NSString *js = [NSString stringWithFormat: @"processImage('data:image/jpeg;base64,%@')", image64];
    [webView stringByEvaluatingJavaScriptFromString:js];

    //dismiss the image picker
    [picker dismissModalViewControllerAnimated:YES];

}
- (void)imagePickerControllerDidCancel:(UIImagePickerController *)picker {

    //cancel was hit inside of the camera view
    [picker dismissModalViewControllerAnimated:YES];
}
@end
And with that we have our last methods to bring it all together. If you recall, we set up objc://takePicture in the HTML view which runs our first method, setting up the UIImage Picker. Once the camera launches, it is out of our hands until the user cancels or confirms an image. When this happens, we take the image, convert it to a JPEG file and Base64 Encode it. You will see that I have used a Base64 Category built by Matt Gallagher . My only caution is that the one provided directly by him adds line breaks (\n) occasionally which seems to break the javascript. Therefore, in my sample code provided I have commented out the lines in his code that created these breaks.
Lastly we create a NSString of Javascript and tell our webview to execute it. As you can see, we are running the function processImage()we set up for ourselves much earlier.
In Closing
I hope that this is a useful tutorial and template for you. Feel free to download the sample code if you haven't already. If you have any questions or would like to see more tutorials like this in the future, please let me know.
-
http://twitter.com/snrkysnrky snrky
-
Skinnyuser
-
Anonymous
-
http://twitter.com/Bigheadedegg Matt
-
Anonymous
-
Desiree
-
Anonymous
-
Desiree
-
mungbeans
-
mungbeans
-
Anonymous
-
Developer
-
Anonymous
-
Beginner
-
Guilherme Rogieri
-
Wwwwwpwd
-
Anna Harris
-
[email protected]
My Personal iPhone Apps